Sunday 26 June 2016

Cherry and Nuts Brown Rice Kheer


Dried fruit is fruit from which the majority of the original water content has been removed either naturally, through sun drying, or through the use of specialized dryers or dehydrators. It is a known fact that dry fruits and nuts are packed with essential nutrients. Though available in small packages, they are an abundant source of proteins, vitamins, minerals and dietary fiber. Right from skin benefits to medicinal benefits. With high iron levels, dry fruits like raisins, and apricots are essentials to fight or prevent anemia. Dry fruits have optimal levels of vitamins and minerals, and are a natural solution for weight management. There are so many delicious recipes which we can make from dried fruits, But Kheer is all time favorite for me and family. Kheer is a rice pudding from the cuisine of the Indian Subcontinent, made by boiling rice, Broken wheat, tapioca, or vermicelli with milk and sugar; it is flavored with cardamom, raisins, saffron, cashews, pistachios or almonds. It is typically served during a meal or as a dessert. 

Kheer is prepared in festivals, temples, and all special occasions. It is often garnished using almonds, cashews, raisins and pistachios. It is an essential dish in many Hindu feasts and celebrations. While the dish is most often made with rice, it can also be made with other ingredients, such as vermicelli. This Kheer is different from the regular version. It contains Dry fruits, and Sweet fruit crush, Which I have decided to take cherry. Yeah, You reading it right, Its Cherry :) Well, Here in Doha, I can easily get Cherry crush in small and big both the bottles, Its sweet and so so delicious, Sometimes I simply spread on my Bread, roll it and I enjoy it ...Ahhh, I am writing it and felling like to have it right away...Well, will get it after finishing my this post, ;) 


One more thing is interesting for this kheer is, The Rice which I have used are Brown one. They are Brown Rice, So its healthy too. and this rice are bit big grain. so when I was making this Kheer, When they turned soft, They are well cooked and so delicious with boiled milk. We enjoyed this delicious Cherry and nuts kheer in our dinner tonight and yeah we loved it. Addition of Nuts will make this kheer rich and more more delicious.


This our 46th #Foodiemonday Bloghop event, and this time our theme is #dryfruits. Its been a long time I haven't made kheer at home, so decided to give a treat to my lil family....But with lil twist of adding sweet cherry crush, If you cant find this cherry crush, simply you can make it at home too, Just add chopped cherries in a pan, add sugar, let it boil, add some water as needed, cook it, cool down it, and your fresh crush is ready to use :) So You all check out the recipe below and enjoy the richness of this kheer :)


Ingredients:

   50 gm Brown Rice
   1 liter Full Fat Milk
   2 Tbsp Condense milk
   11/2 Tbsp Cherry Crush
   Sugar If needed
   11/2 Tbsp Almonds, sliced
   1 Tbsp Raisins
   5-6 Green Cardamom, powder


 Method:

1.  First take a bowl and place Rice in it, Wash the rice and soak them for 1/2 hour.

2. Now Take another deep pan, add milk in it and let it starts boiling, add soaked rice into it. Stir milk with a spoon and after kheer simmers, reduce the flame. keep on stirring kheer, When rice softens, add Cherry Crush in it, Stir it well then add Sliced Almonds and Raisins.

3. Kheer has got thick in consistency. Add Condense milk in kheer and cook for 2 minutes. Kheer is ready, turn off the flame and add cardamom powder into it. Garnish it with some almond slices.

Take out kheer in a bowl. Its delicious when its hot, but you can even keep it in refrigerator to serve chilled. Chilled kheer taste more delicious.


Enjoyyyyyyyyyyyyyyyyyyyy!!!!!!!!!!!!!!!!!!!!!

Tuesday 21 June 2016

Dahi Vada


Dahi Vada, A very popular and all time favorite snack food which is so so delicious and mouthwatering. I am a diehard fan of Dahi Vada or Dahi bhalla, I mean every indian love to have this Dahi vada...That delicious Tamarind chutney, hint of chili powder, Loads of beaten Yogurt, Ohhh Hence, My Dahi Vadas are over but still I can feel that taste in my mouth...Feeling like Did I make a less Quanity of them?? Or I should soak more Urad dal to make more batches of these Vadas. Well, Though I made 2 plates each for me and Himanshu...small one for Prisha....But the measurement went wrong, Prisha had big wh
ole plate of this Dahi Vadas without chili powder, and she enjoyed it a lot...Yesterday Night I was asking her what you want to have in your lunch box for tomorrow....And she said, Mom I want to have that round round balls with that mithi mithi chutney... ;) Lol...She didnt remember the name of the dish...But she knows that she ate that one and she wants that only ....Hahahaa...I told her that you cant take it in your lunch box, you will not be able to eat that in school...And she was lil upset with me and, She kept up her one eyebrow and showing me Tashan...;) I told her I will make it for you tomorrow. and after lots pampering drama she was Ok with that ;) 


The hot deep fried vadas are first put in water and then transferred to thick beaten yogurt. For best results, the Vadas are soaked for at least a couple of hours before serving. To add more flavor, they may be topped with coriander or mint leaves, chili powder, crushed black pepper, chaat masala, cumin, shredded coconut, green chilis or boondi. Sweeter curd is preferred in some places in India, especially in Maharashtra and Gujarat, although the garnishing remains the same. A combination of coriander and tamarind chutneys are often used as garnishments in addition to those mentioned above.


Many times it happens like I crave for these Dahi vada, Here's the one Restaurant in Doha called Zaffran...I love Dahi Vada of this place...You will love it like heaven. Whenever I visit that place I make sure to have atleast one plate of this Dahi Vada, Well sometimes Two too ;) This time decided to make it at home and here's the dream come true ;) A super tempting, Delicious and mouthwatering Dahi Vada recipe is here for all of you...This recipe is inspired by Tarala Dala's Recipe, So tried to make it by her way..And it comes out very well !!! So, You guys check out the step bye step recipe below and Enjooooooooooooyyyy the heaven ;) !!!!!!!!!!!!!


Ingredients:

For the Vadas

1/2 cup Urad dal, soaked for 4 hours
1/4 tsp Soda
salt to taste

Method:

1. Wash and drain the urad dal.

2. Grind together the urad dal, and salt in a mixer or food processor to a coarse paste.


3. Add the soda to the urad dal paste and mix well till the batter is light and fluffy. Add a little water if required.


4. Wet your hands and take 2 tablespoons of the batter on your palm and shape into a circle, Deep fry in hot oil on a slow flame till the Vadas are golden brown for about 10 minutes.


5. Drain on absorbent paper.


For Tamarind Chutney:

Ingredients

200 gms dates
100 gms Tamarind
1/2 tsp chili powder
1/2 tsp roasted cumin seeds powder
1/4 tsp black salt
salt to taste

Method

1. Remove seeds from the dates and tamarind, wash and add water. Leave for an hours then Cook it for 5 minutes. Thereafter, blend in a liquidizer and strain.

2. Add the chili powder, cumin seed powder and salt. Mix well.

Assemble dahi Vada

1. Soak the deep fried Vadas in water for about 45 minutes.

2. Just before serving, drain and squeeze out the excess water.

3. Arrange the Vadas on a serving dish and top with beaten curd. Garnish with chilli powder, cumin seed powder and Black salt, Chaat masala and serve with tamarind  chutney.
Enjoyyyyyyyyyyyyy!!!!!!!!!!!!!!


Enjoyyyyyyyyyyyyyy!!!!!!!!!!!!!!!!!

Sunday 19 June 2016

Foccacia Bread


Bread is a staple food prepared from a dough of flour and water, usually by baking. It has been popular around the world and is one of the oldest artificial foods, having been of importance since the dawn of agriculture. Although no one really knows when the first loaf was baked, bread has been around for thousands of years. The presence of stone utensils and ovens dating back to the Neolithic seems to be witness to this. Bread was initially unleavened, as the first yeast was introduced by the Egyptians around 4000 years ago. In ancient Rome bakers were considered important members of society, as bread had an essential role, both for nutrition and religion: it was usual to bake and offer ritual loaves of bread during festivals to the gods. This was actually so common that, often, ovens were even built in temples. Romans were also the first to produce the type of flour needed to bake what is known today as "white bread", and they improved wheat's milling techniques. It is pretty clear that the roots of bread making in Italy go far back in time.

Focaccia is a flat oven-baked Italian bread similar in style and texture to pizza dough. It may be topped with herbs or other ingredients. Focaccia is popular in Italy and is usually seasoned with olive oil, salt, sometimes herbs, and may at times be topped with onion, cheese and any other toppings. It might also be flavored with a number of vegetables. Focaccia can be used as a side to many meals, as a base for pizza, or as sandwich bread. Focaccia al rosmarino (focaccia with rosemary) is a common focaccia style in Italian cuisine that may be served as an antipasto, appetizer, table bread, or snack.


Focaccia al rosmarino is a popular style of flatbread in Italian cuisine prepared using focaccia dough, rosemary, olive oil and salt, sea salt or kosher salt. Whole or sliced fresh rosemary leaves may be used, as can dried rosemary. Rosemary is among the most common herbs used to flavor Focaccia bread. Additional ingredients such as garlic, or basil may be used. Here I am topping my Focaccia with bell peppers and Dried Rosemary and some black pepper. The aroma of this Bread is just awesome because of Rosemary. I was so happy that my bread came so perfectly baked and we enjoyed it in our dinner by making some Focaccia sandwich with cream cheese and veggies. That was damn delicious. This was my first attempt for making Focaccia. First I was thinking to make typical normal Focaccia which contain Basil leaves and Rosemary topping. But Couldn't make it to go and buy Basil leaves so dropped the idea and thought to make it with colorful Bell peppers. I enjoyed baking this Lovely Bread. Today It was a baking day for me. I baked three back to back recipes. In the morning I baked Focaccia, Then baked Dinner Rolls, Then As it is a Fathers day today, So Prisha wants to give her paa a surprise, She told me to make a cake. ;) There are many Bananas At home, So baked Banana and coffee flavor Cake. A simple one, small one and just topped it with some sliced almonds and coffee. It was wonderful. Himanshu came back home, as Prisha was waiting for him eagerly. She can't keep that surprise in her, Hahahha my lil princess :) And she hugged him told him Happy Father's Day papa, We made a cake for you...Hahahah....And he was like.....Reallyyy???? Looking at me so surprisingly :) And I nodded with a smile ;) In her School, Her School staff sent one T-shirt to every Super Dad with the Palm print of their kid. Prisha too made it and got it back to the home. Himanshu wore it and got emotional, which he never ever been. Well, He enjoyed the moment and I felt so so good by watching this beautiful bond of father and daughter. As its a pretty  beautiful that every daughter is a princess of her father, As me too ;) Love you Paa :) Happy Father's Day to you too :) This is the T-shirt :)

As This Post is for our 45th Foodiemonday Bloghop...Woooow!!!! This time we all foodies are coming with different Breads.....The Theme is #Breads....Sounds Cool Right ? ;) You all gonna enjoy varieties of Bread from our Foodiemonday team. and It was an amazing experience when I was Baking it :) So you guys check out the step by step recipe below :) Happy Baking :)


Ingredients:

1 1/3 Cup milk
1 tsp granulated sugar
1 3/4 tsp instant yeast
3 1/4 cups flour
2 tsp salt
1/4 Cup olive oil
1/4 cup Tricolor Bell Peppers,
1 tsp dried rosemary
1/2 tsp Black pepper, crushed or powder


Method:


1. Heat the milk and turn off the flame. Stir in the sugar into the hot milk. When the milk is lukewarm sprinkle the yeast and allow to rest for ten minutes.


2. Take a bowl and add flour and salt and mix well. Stir in the oil and yeast mixture. Mix it with your hands that dough comes together. Then knead the dough for four to five minutes. Now use the base of your palms to knead into a smooth pliable dough on a work surface or a clean kitchen platform.


3. Roll the dough into a rough rectangle using a little corn flour, Carefully transfer the rolled dough into a greased 9” by 12” baking  tray. Spread and shape the dough to fit into the tin.


4. Allow to rest in a warm place for 1 1/2 to 2 hrs until the dough raises and doubles in size.


5. After the dough is raised and doubled in size, make equally spaced indentations with your thumb or forefinger. Apply lots of Olive Oil on the top of the bread, Place the sliced bell peppers and Sprinkle the Dried Rosemary and some black pepper on it. Again sprinkle some Olive Oil on the topping.


6. Bake in a Pre-heated oven at 200 C for 20-25 minutes.


Monday 13 June 2016

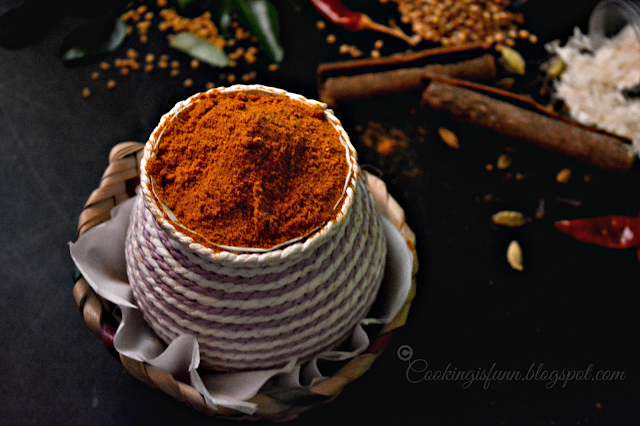
Andhra style Sambar Masala Powder

Spices have been closely associated with cultural traditions, magic, preservation, medicine and embalming since early human history.  India is known as the home of spices and boasts of a long history of trading with the ancient civilizations of Rome and China. Indian spices are the most sought-after globally, given their exquisite aroma, texture and taste. India has the largest domestic market for spices in the world. Indian spices include a variety of spices grown across the Indian subcontinent With different climates in different parts of the country, India produces a variety of spices, many of which are native to the Subcontinent, while others were imported from similar climates and have since been cultivated locally for centuries. Spices are used in different forms: whole, chopped, ground, roasted, sautéed, fried, and as topping. They blend food to extract the nutrients and bind them in a palatable form. Some spices are added at the end as a flavoring and are typically heated in a pan with ghee or cooking oil before being added to a dish. Lighter spices are added last, and spices with strong flavor should be added first.


Sambar powder is a flavorful South Indian style coarse textured Spices powder, prepared by grinding various type of basic Indian spices like coriander seeds, cumin seeds, mustard seeds, black peppercorns, dry red chilies, fenugreek seeds, cinnamon, dry coconut etc. with chana dal.  

Sambar is made either exclusively with one of these vegetables or a combination of them - drumstick, carrot, Radish, pumpkin, potatoes, tomatoes, Brinjal and whole or halved shallots or onions. Sambar powder is a coarse powder made of roasted lentils, dried whole red chilies, fenugreek seeds, coriander seeds, Asafoetida, curry leaves with regional variations including cumin, black pepper, grated coconut, cinnamon, or other spices. The vegetables, tamarind pulp, Sambar powder, turmeric, salt, and Asafoetida are boiled together, Until the vegetables are half-cooked. After the vegetables are half cooked, the cooked lentils are added and allowed to cook until the vegetables are done. Sambar is garnished with fresh curry leaves or coriander leaves. Mustard seeds, black gram, and dried red chilies, and curry leaves tempered in vegetable oil is added to the cooked Sambar. 

Sambar is usually served with steamed rice as one of the main courses of both formal and everyday south Indian cuisine. A two-course meal of Sambar mixed with rice and eaten with some sort of vegetable side dish followed by Yogurt mixed with rice is a prime southern Indian staple. Vada Sambar and Idli Sambar are popular for breakfast or evening snack in the south Indian states. Road side restaurants often offer free refills of Sambar for Idli and Vadas. Sambar is also served as a side dish for dosa. 


This is our 44th foodiemonday Bloghop event and this time we are back with the theme of #indianspicessorted We all are coming with different dishes with the usage of Indianspices.. I am contributing All the way use of so many spices in a form of Sambar Powder which is damn popular in south indian cuisine. Its very easy and when you making it the smells so so good, that fresh aroma of this Sambar Powder is so so good. I adopted this recipe from my very good friend Anitha Raj who runs her blog at www.passionatedcook.blogspot.com

She is an expert in making kefir and kombucha...You can join her facebook group called kefir and kombucha makers which is so so healthy to improve your Immune system. Do check her blog for some another awesome recipe too :) Thanks AR for sharing this recipe with me :) I am so glad and this Sambar masala turns so so good..Aroma was awesome when I was making it :) So you guys check out the quick and easy recipe of this Andhra Style Sambar masala Powder :)

Ingredients:

1 Tbsp Chana Dal
1/2 Tbsp Urad Dal
3 Tbsp Whole Coriander seeds
1 Tbsp Cumin seeds
1 Tbsp Fenugreek seeds
4 Cloves
1 tsp Black pepper
4 (Peeled) Elaichi Seeds
1 tsp Rice
1 Tbsp Turmeric Powder
3 to 4 Pinch Asafoetida (Hing)
10 to 12 (Whole) Red Chilly Powder
20 to 26 Curry leaves
2 Pieces Cinnamon

Method:

1. Put the Chana and Urad dal on the Pan and fry till they turn light brown.

2. Take out the fried dals on a plate. Put coriander, Jeera, Methi, Rice all of the spices in the pan and fry till these turn light brown then take them out.

3. Once the spices cool down, mix all the remaining spices and dals, grind to make a fine powder.

4. Sambar Masala is ready. Fill the Masala in an air-tight container, whenever you are preparing Sambar use the Sambar Masala.

 
 Enjoyyyyyyyyy!!!!!!!!!!!


Saturday 11 June 2016

Cheesy Aloo Bread Pakora


Pakora  also called Pakoda is a fried snack (fritter), Pakodas are popular across India, They are sometimes served in a yogurt-based curry  which is called salan, as main dish, pakoda curry, rather than as a separate snack. In this case, the pakodas are generally doughier and are made from chopped or mashed Potato onion, and chili mixed into the batter.

Pakodas are created by taking one or two ingredients, such as onion, eggplant, potato, spinach,  Paneer,  or mix vegetables. They are also occasionally prepared with bread, They are dipped in a batter made from gram flour and then deep-fried. The most popular varieties include pyaaz pakoda, made from onion, and aloo pakoda, made from potato. Other variations include Palak pakoda, made from spinach, and paneer pakoda, made from Paneer (soft cottage cheese). They are also known ad=s bhajias.  Pakodas are usually served as a snack or appetizer. Pakodas are popular as a fast food snack. They are also often served with chai to guests arriving to attend Indian wedding ceremonies, and are usually complemented with tamarind chutney, brown sauce, or ketchup. Its a perfect Tea time snack, to enjoy with Tea or coffee..Some people also fry some Green chilies with it and they enjoy this fried chilies with these Pakodas.


Stuffed Aloo Bread pakodas are my favorite one, I was not able to control myself when I was making it. To make them more delicious I have added Cheese slices in it...And It was so so yum... These Pakoras are stuffed with boiled and mashed Potato mixture. The mixture contains, Onions, ginger and chili paste, some spices, and lots of chopped coriander leaves. Many people add some curry leaves too, Curry leaves enhance the flavor of this mixture, I haven't added curry leaves in it though it was delicious. This recipe is inspired by Tarala dalal's recipe. You can enjoy them with Tomato ketch up, or with some green chutney or with Sweet and tangy tamarind chutney. Its also a perfect snack when guests are there at teatime. So check out the step by step recipe below and Enjoyy this cheesy Aloo Bread Pakoras.


Ingredients:

6 Slices White Bread
3 slices of Cheese

For Aloo Masala

1 cup boiled, peeled and mashed potatoes
2 tsp oil
1/4 Cup Onions, Chopped
1/2 tsp mustard seeds
1/4 tsp turmeric powder
1 tsp ginger-green chili paste
1 tbsp finely chopped coriander
Salt to taste

For batter:
1 cup Besan (Bengal gram flour)
1/4 tsp turmeric powder (haldi)
1/2 tsp chili powder
A pinch of Asafoetida (hing)
Salt to taste
Water as required

Method:

1. Heat the oil in a deep non-stick pan and add the mustard seeds.and saute Onions until they turned pink.

2. Add the potatoes, turmeric powder, ginger-green chili paste, coriander and salt, mix well and cook on a medium flame for one minute.


3. Now take a bowl and add Besan, turmeric powder, chili powder, hing and salt mix them all well, and add the water as required to make it thick pouring consistency batter.


4. Spread a portion of this aloo masala evenly on slice of bread and Put Cheese slice on it then place another slice of bread over it, press lightly and cut it diagonally into 4 equal pieces.


5. Heat the oil in a deep non-stick kadhai, dip one piece at a time in the Besan batter and deep-fry on a medium flame till it turns crisp and golden brown in color from both the sides. Drain on an absorbent paper.

6. Serve it with any sweet and tangy chutney, or with ketch up...perfect tea time snack to Enjoy :)


Enjoyyyyyyyyyyyyyyy!!!!!!!!!!!!!

Wednesday 8 June 2016

Spicy Corn Salad


Sweet corn cut off from the cobs is generally eaten with peas (where this combination, given the practicality of steamed canned grains in an urban diet, is a frequent addition to diverse meals such as salads, stews, soups, pasta, and, most famously, whole sausage hot dogs.  Sweetcorn provides useful amounts of vitamins A, B3 which supports metabolism, the nervous and digestive systems and C. It also contains folic acid and fiber.

Boiling is the classic way to prepare sweet corn. You can either use a wide, flat pan and lay the corn on its side, or use a taller stockpot to boil a big batch at once. Either way, fill the pan with enough water to cover the corn and bring it to a boil. Shuck off the outer husk and silk from the corn. Dissolve a tablespoon of salt in the water and add the corn. If your corn is very fresh, cook it for three to five minutes. For corn that’s a few days old, go for six to eight minutes. You can boil them in microwave too or grill them! fresh sweet corn has much less calories than that of in the field corn and other cereal grains like wheat, rice, etc. Sweet-corn kernels can be used much like a vegetable rather than as a cereal grain. In general, its whole or section of the cob may be served as a main dish.

Sweet corn salad is the perfect one to enjoy it anytime. you can enjoy it in your lunch time or in dinner as a side dish. sweet corn kernels itself are very tasty, addition of some tomatoes , onions, Chaat masala, some fresh lemon juice enhance the flavor of sweet corn salad.. I personally love this salad a lot...Just today I made this salad at teatime as Himanshu is coming home bit early because of Ramadaan month, so thought to give him some healthy snack type item. Its a perfect Iftaar or sehri dish too when you are fasting on this holy month of Ramadan. You can enjoy this salad if you are thinking to loose your weight, this is perfect meal for weight loss menu. So, to enjoy this beautiful looking Sweet corn salad check out the simple recipe below and Enjoyy!!!


Ingredients:

2 Cup Sweet Corn Kernels
1/2 Cup Chopped Onions
1/2 Cup Chopped Tomatoes
2 Tbsp Coriander leaves, chopped
1/2 tsp Chaat Masala
1/4 tsp Rock salt
1/4 tsp Red chili Powder
half lemon

Method:

1. If you are using Canned Corn Kernels you can simply use them directly, And If you need to boil them, Simply boil them with some salt and Butter.

2. Now, Take Bowl and add Sweet corn kernels in it, chopped Onions, Chopped Tomatoes, Coriander leaves, some Chaat Masala, rock salt, red chili powder and at the end Squiz Half lemon in it. Mix them all very well and serve it.


Enjoyyyyyyyyyyyy!!!!!!!!!!!!!!!!

Monday 6 June 2016

Crostini - Ramadan special


Crostini are an Italian appetizer consisting of small slices of grilled or toasted bread and toppings. In short little Toasts. The toppings may include a variety of different cheeses, and vegetables, seafood or may be presented more simply with a brush of olive o
il and herbs or a sauce.

I am a fan of Italian Food, and whenever it comes to Italian Food, I can never say NO to Italian food. I like that mild seasoned flavor of each dish which I have tasted. The usage of garlic and my favorite seasonings like Oregano, Chili flakes, Black pepper, These spices make this Food to enjoy thoroughly. BTW I am a diehard fan of cheesy and garlic flavor White sauce..Well, My mouth is already watering...And its already a midnight, and I don't want to go back to the kitchen and make this white sauce with some Penne or I can simply enjoy it by topping it on french loaf. There are so many dishes which I like in Italian Menu, including my favorite Dessert Tiramisu too, Crostini is also one of them. Its very easy and quick to make. If you have French Loaf at home, Then You have nothing to do. Simply make Topping of your choice, some mozzarella cheese and you are done with this gorgeously looking handy crostinis. 


I love bell peppers, So, Whenever I will post any Italian dish, Bell peppers will be there for sure ;) I love that colorful pictures, which make your food so inviting and delicious. Here in this crostini post I have used Three color Bell peppers Red, Green and Yellow...On a top of that Cherry Tomatoes are so  in season these days, Got some very fresh and beautiful Cherry tomatoes, Topping them too on my crostinis. you can change the toppings of your crostini, As I am from pure vegetarian Family, I will go with this toppings, You guys can use any topping of your choice. I made this crostini today afternoon, and then I was thinking that let just put this baked crostini in Aluminium Foil, as I know This will not taste good when I reheat them just for a minute in oven...Guess what I did...I had 4 of these gorgeous looking little Toasts and I was so so full after having them....I mean Ofcourse ;) Even Prisha had one whole Crostini as I was thinking she will not finish it off but she did...BTW she was calling this little toasts a Mini Pizza ;) She was so excited when I was baking them. In every minute she was asking me like..... Ho Gaya?? (Are they done?) ;) And I told her whenever they are done I will give you all of them ...And she was like Hurrraaayyyyyyy...jumping off ;)

This is our 43rd Foodiemonday Bloghop event, And we guys are lucky that the Holy month Ramadaan is starting from Monday....So we Foodies have decided to start this Holy month with our ramadaan special recipes. which you guys can enjoy during Iftaar time or in Sehri time, or a main course menu. I am contributing some easy and less time spent recipe which you can enjoy at your Sehri or Iftaar time. Wish you all the Ramadaan Kareem and stay blessed you all :) 
Here, Check out the step by step recipe of Crostini with cherry tomato topping and Enjoyyy it :)


Ingredients:

1 Fresh French Loaf
2 Tbsp Butter
11/2 Tbsp Garlic Paste
1 tsp Olive Oil
1 Cup Chopped or sliced Red, Green and Yellow Bell Pepper
11/2 Tbsp Tomato Ketchup
1 tsp Pizza Seasoning
1 tsp chopped Parsley
Salt To Taste
1 Cup Mozzarella cheese
1/2 tsp Dry Oregano
1/4 tsp Black Pepper Powder
7-8 Cherry Tomatoes

Method:

1. Cut the French Loaf into thin Slices.

2. Take a Bowl and add Butter, Oregano, Garlic Paste, fresh Parsley and mix well.


3. Apply this Butter mixture evenly on the Loaf slice on both the sides.

4. Take a baking tray and apply Lil amount of butter on it and Put these slices and put it in the Oven and bake it for 5 minutes at 180 degree C.

5. In a frying Pan put some Olive Oil and add just 1/4 tsp of Garlic Paste,  Bell Peppers, Fresh Parsley, Pizza Seasoning, Dry Oregano, Tomato Ketchup, Coarsely grind-ed Black Pepper and fry them for a few minutes. Turn off the Flame, Let the Topping cool a little and salt to taste.


6. Take out the Bread slices from the oven and Top the Bread Slices with the bell peppers topping.


7. Top it up with Mozzarella cheese and sprinkle pizza seasoning on the cheese.


8. Again, Put the Bread Slices back in oven for 5 - 6 Minutes and bake it till the cheese melts.Then Top it with some beautiful cherry Tomatoes. :)


Enjoyyyyyyyyyyyyy!!!!!!!!!!!